Security Camera Kit
Revision as of 00:55, 18 February 2013 by imported>NelsonJenkins
The Security Camera Kit is a package of three HUD-controlled security cameras with a controller desk for selective access made by Gentek.
Setup
The cameras can be set up in a matter of seconds. NOTE: Do not rez cameras within 3 seconds of each other - this is to allow them time to detect other cameras and avoid naming conflicts.
- Rez your chosen camera and position/rotate it to your liking. For the Dome model, click it and select "Mount Opts" to change the mounting bracket. A corner-mount is available, as well as no bracket for roof/overhang mounting.
- The camera will automatically name itself; however, if you wish to name your cameras and group them together, click it and select "Set ID" and "Set Group". See below for an explanation of IDs and Groups.
- Repeat steps 1 & 2 for each camera you want. (Cameras can be added/removed later.)
- Rez the Security Camera Desk and open the _access notecard inside it. Read the instructions at the top to set your access settings. Save & close the notecard.
That's it - you can now test out your cameras.
Using the System
Just sit on the desk and accept the attachment permissions. The HUD will automatically attach, and then you can browse between cameras.
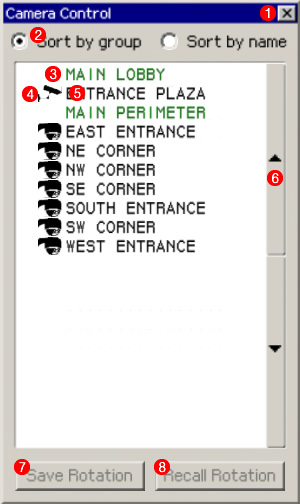
Camera HUD
- Exit - Removes the HUD and stands you up. Always use the X button to end your session! Otherwise, the camera you were viewing may not be reset properly.
- Sorting Options - Sort by group separates cameras into their groups, while Sort by name sorts all cameras alphabetically without group designations.
- Group Header - Identifies a camera group. Group headers aren't clickable.
- Type Icon - Identifies the type of camera, e.g. box (shown), dome (below), and interior (not shown).
- Camera ID - The ID of the camera. Click this (or the Type Icon) to select/deselect that camera.
- Scroll Buttons - Scrolls between pages, if there are more than 20 cameras.
- Save Rotation - Saves the current camera rotation as the default rotation.
- Recall Rotation - Recalls the default rotation. This is also done when the camera is deselected.
NOTE: The HUD cannot be used by manually attaching it; it must be rezzed and auto attached from the desk.
Troubleshooting
- I can't sit on the desk.
- Make sure you have access to it (the owner is always given access, but other users must be added to the access list).
- There may be an error that's causing you to be kicked off; check local chat for a notification.
- The HUD is not showing up, or "Unable to rez HUD."
- You must accept the attachment permissions request for the HUD to attach. Check your notification bar.
- The desk must have permissions to rez on the parcel - check to make sure rezzing is enabled. If it is restricted to the land group, you must set the desk to the land group.
- The parcel may be full - the HUD requires 43 available prims to rez.
- "A duplicate camera ID was detected" or "Camera ID already in use - please change ID to something else."
- The system won't work if two cameras have the same ID, even if they are in separate groups. Change the ID of the camera.
- You may have rezzed two cameras within 3 seconds of each other, and their IDs are identical - don't do this.
- The HUD just shows "Initializing..." and there is no error message.
- In laggy sims, this may take more than a few seconds.
- Make sure scripts are enabled on the parcel.
- "WARNING: linkNum returned 0 for camera link. Camera will not work."
- The camera was unlinked. Re-link the camera together.
