Difference between revisions of "SZYM Intruder"
imported>Ac14 (→Templates) |
imported>NelsonJenkins |
||
| Line 1: | Line 1: | ||
{{ SZYMMFG | {{ SZYMMFG | ||
| − | | title = | + | | title = SZYM Intruder |
| image = [[File:intruderprototypepolice.jpg|200px|center]] | | image = [[File:intruderprototypepolice.jpg|200px|center]] | ||
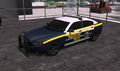
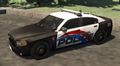
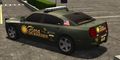
| − | | caption = | + | | caption = 2013 model in Prototype Police custom livery. |
| badge = SZYM | | badge = SZYM | ||
| production = 2012-Present | | production = 2012-Present | ||
| Line 13: | Line 13: | ||
}} | }} | ||
| − | The SZYM Intruder is a | + | The '''SZYM Intruder''' is a four-door sedan manufactured by [[SZYM Motors]]. |
| − | |||
| − | |||
| − | == | + | ==Quickstart Guide== |
| − | + | This article explains some notable features of the 2013 SZYM Intruder. It will also help you get acquainted with the EVHUD 3, the new SPT (Simulated Power Transmission) system, Web Configuration and more. | |
| − | + | ||
| − | + | '''This demonstration mentions use of lightbars, the spotlight and other police vehicle related parts. It's recommended you try this with the ''SZYM Intruder Vertex'' or ''SZYM Intruder Priority'' models.''' | |
| − | + | ||
| − | + | ===Movement=== | |
| − | + | ||
| − | + | When first rezzing the Intruder, you will notice complete and total mesh construction which allows for many new features otherwise not possible using the sculpted medium. Select and right-click the vehicle to get in. Right away you will notice the interior displays and gauge cluster (when the camera temporarily moves to the 'Interior' view). We have removed SetText for Gear display, which is now visible on the dashboard itself. There are 10 throttle settings (1-9,H) and a 'Neutral' gear for revving the engine (accessible if throttle setting is below 1). There is no need to switch throttle settings at any time to go into reverse. Simply double tap the back key and reverse will be activated. Additionally, brakes work while moving backwards. | |
| − | + | ||
| − | + | The Intruder offers the same 'simulated suspension' offered by Astaro's Renegade to add the illusion of 'body roll'. When turning or moving and stopping quickly you may notice the vehicle move side-to-side or front-and-back. | |
| − | + | ||
| − | + | '''MOST IMPORTANTLY''', when you flip the vehicle by being the reckless driver that you are, you can ''UNFLIP'' it by pressing the Right and Left arrow keys ''at the same time''. | |
| − | + | ||
| − | + | ===EVHUD 3=== | |
| − | + | ||
| − | + | Before you get moving, get the new EVHUD. Click the vehicle then 'Get HUD'. The slim design of the HUD makes it easier to see around and allows for more controls to be displayed. All the way on the left are your emergency light controls. The section right of that houses the spotlight controls. Click the 'Spot' button and the spotlight will turn on. You can control the position of the spotlight with the 'Aim' buttons (this uses projected lighting. Depending on your viewer, this feature is usually enabled by checking the 'Lighting and Shadows' box in the 'Graphics' tab of the Preferences menu). | |
| − | + | ||
| − | + | You can see the Throttle setting in blue under the turn signal controls. There is a 'message center' on the Dashboard Gauge cluster area which is also visible on the HUD. | |
| − | + | ||
| − | + | The right of the HUD has controls for sirens, similar to the older EVHUD. However, now simply click the empty siren slots or eject the current siren and you will be able to select one of 12 different included sets of sirens effortlessly. | |
| − | + | ||
| − | + | Under the siren control, the Radar controls are displayed. It will turn on automatically when getting into the vehicle however it can be shutoff or the current speed displayed can be 'locked'. You can also toggle the rear facing radar by clicking 'REAR' in the center of the HUD. 'TKDOWN' turns on take-down lights on the lightbar. 'Cut F' and 'Cut R' allow you to shutoff ALL lights either on the front of back of the vehicle. | |
| − | + | ||
| − | + | If a user gets into the front passenger seat while your driving (and they are wearing the EVHUD v5.0), you will be asked if you want to 'Allow' them to use the Siren and Light controls. This means you can drive while your friend/ co-worker/ uncle uses the Siren and Lights controls so you attend to the real task at hand, catching the bad guys. | |
| − | + | ||
| − | + | ===Web Config=== | |
| − | + | ||
| − | + | As before, you can always change most all configuration options via the 'blue GUI menu system' when clicking on the car. However, you can now configure all models with a rich web interface that generates 'configuration codes'. Codes can be saved on your 'account' which is easy to setup. From there, you can either apply these directly to a car in-world (by clicking the car, 'Web Config') or share these configuration codes in-world to assist other's in setting up their vehicle liveries. Lightbar color's can be setup, plate/ unit numbers easily changed and much, much, much... MUCH more. | |
| − | + | ||
| − | + | ===Trunk Equipment=== | |
| − | + | ||
| − | + | Open the trunk and alt-cam inside! You will find road flares, road cones, caution tape and a TPF compatible Fire Extinguisher. To use these, click them and they will ask to attach to your avatar. This prevents your inventory from being filled with numerous unnecessary items. | |
| − | + | ||
| − | + | ====Road Cones==== | |
| − | + | ||
| − | + | Some of these items are in limited quantity for simplicity. For instance, the cones yield 4 which can be placed by clicking on the location you want them. Clicking the road cones once they are on the ground deletes all road cones you have placed for easy removal. You can always get more from the trunk if you so desire. | |
| − | + | ||
| − | + | ====Caution Tape==== | |
| − | + | ||
| − | + | Cordoning off a scene has never been easier now with the new Tredpro Caution tape. One you wear the object, click where you want the corners of the scene to go. Once you have finished placing the posts for the caution tape to be applied to, click 'Page Down' and the tape will rez along your requested path. Again, just click the tape again and it will delete itself. | |
| − | + | ||
| − | + | ====Road Flares==== | |
| − | + | ||
| − | + | Once worn, click and hold to throw them (for your entertainment) or place them where you are standing by just clicking once. Three will be provided per set which will make for more then enough lighting needed to grab oncoming drivers attention. They have a 'lifespan' of 30 minutes each once placed. | |
| − | + | ||
| − | + | ====Camera Modes==== | |
| − | + | ||
| − | + | You can now choose from several different camera views when clicking the vehicle, then selecting the 'Camera' menu option. | |
| − | + | ||
| − | + | ''Normal:'' Default 3rd person view. | |
| + | ''Dashcam:'' Positions the camera behind the police dashboard camera (complete with a working display). | ||
| + | Interior: This view is useful if you wish to have an interior view out of the car yet still have access to the HUD to control lights, sirens, etc. | ||
| + | ''Roof:'' (Self explanatory) | ||
| + | ''Door:'' (Self explanatory) | ||
| + | ''Roadside:'' A 'cinematic' style view for your personal entertainment or possibly for Machinma. | ||
| + | |||
| + | ===Adjustable Drivers Seat=== | ||
| + | |||
| + | After getting in the vehicle, click the car and choose the menu option 'Stop Engine'. Click the car again and choose 'Adjust Seat'. The Forward and Back arrow keys move the seat forwards and backwards. Page Up and Page Down will move the seat up and down. If someone else changes the seat position, it won't erase yours. Up to 20 recent user's seat configurations will be saved. This helps give you better visibility of the gauge cluster when driving in mouse-look or using one of the 'Camera Modes'. To stop configuring, select 'End Adjust' from the menu. | ||
| + | |||
| + | ===Center Console=== | ||
| + | |||
| + | When in mouselook, or alt-camming on the center console of the vehicle, a 'Main Menu' is displayed. You can either 'View Map' (displays the regions map image), or 'Display Settings' (choose what appears on your gauge cluster message display). You can also switch MPH to KMH from this menu. A clock displays current SL time. | ||
| + | |||
| + | ===Working Window Controls=== | ||
| + | |||
| + | The driver has control over all 4 windows. Either in mouse-look or while alt-camming inside, you can click the top or bottom of each switch once for it to move up or down completely. Alternatively, you can click and hold the top or bottom of each switch momentarily and release to incrementally move the window to your desired setting. The driver can also 'lock' all windows by clicking the Lock/Unlock button above the window rocker switches on the drivers door. | ||
| + | |||
| + | ===Improved Horn=== | ||
| + | |||
| + | No longer do you have to worry about those pesky people clicking your horn. Only you can click the steering wheel to sound the horn! | ||
| + | |||
| + | |||
| + | ===Interior Ticket Lamp=== | ||
| + | |||
| + | In most all North American police vehicle, a dual Red/ White 'Ticket Writing Lamp' is standard equipment. In mouse-look or via alt-cam, click it once for White local projected lighting and again for Red 'nightime' light. (This lamp is optional on the Civilian version, enabled via the Web Configuration Tool). | ||
| + | |||
| + | ===Customizable Rear Window Gentek InfoCenter=== | ||
| + | |||
| + | There is a customizable Gentek InfoCenter Traffic in the back window of all police models of the Intruder. You can create custom messages to be displayed via the Web Configuration Tool. | ||
==Templates== | ==Templates== | ||
Revision as of 15:54, 22 May 2014
 2013 model in Prototype Police custom livery. | |
| MFG Badge | SZYM |
|---|---|
| Production | 2012-Present |
| Assembly | Prototype MG |
| Engine | NTBI SPT |
| Marketplace Link | |
The SZYM Intruder is a four-door sedan manufactured by SZYM Motors.
Contents
Quickstart Guide
This article explains some notable features of the 2013 SZYM Intruder. It will also help you get acquainted with the EVHUD 3, the new SPT (Simulated Power Transmission) system, Web Configuration and more.
This demonstration mentions use of lightbars, the spotlight and other police vehicle related parts. It's recommended you try this with the SZYM Intruder Vertex or SZYM Intruder Priority models.
Movement
When first rezzing the Intruder, you will notice complete and total mesh construction which allows for many new features otherwise not possible using the sculpted medium. Select and right-click the vehicle to get in. Right away you will notice the interior displays and gauge cluster (when the camera temporarily moves to the 'Interior' view). We have removed SetText for Gear display, which is now visible on the dashboard itself. There are 10 throttle settings (1-9,H) and a 'Neutral' gear for revving the engine (accessible if throttle setting is below 1). There is no need to switch throttle settings at any time to go into reverse. Simply double tap the back key and reverse will be activated. Additionally, brakes work while moving backwards.
The Intruder offers the same 'simulated suspension' offered by Astaro's Renegade to add the illusion of 'body roll'. When turning or moving and stopping quickly you may notice the vehicle move side-to-side or front-and-back.
MOST IMPORTANTLY, when you flip the vehicle by being the reckless driver that you are, you can UNFLIP it by pressing the Right and Left arrow keys at the same time.
EVHUD 3
Before you get moving, get the new EVHUD. Click the vehicle then 'Get HUD'. The slim design of the HUD makes it easier to see around and allows for more controls to be displayed. All the way on the left are your emergency light controls. The section right of that houses the spotlight controls. Click the 'Spot' button and the spotlight will turn on. You can control the position of the spotlight with the 'Aim' buttons (this uses projected lighting. Depending on your viewer, this feature is usually enabled by checking the 'Lighting and Shadows' box in the 'Graphics' tab of the Preferences menu).
You can see the Throttle setting in blue under the turn signal controls. There is a 'message center' on the Dashboard Gauge cluster area which is also visible on the HUD.
The right of the HUD has controls for sirens, similar to the older EVHUD. However, now simply click the empty siren slots or eject the current siren and you will be able to select one of 12 different included sets of sirens effortlessly.
Under the siren control, the Radar controls are displayed. It will turn on automatically when getting into the vehicle however it can be shutoff or the current speed displayed can be 'locked'. You can also toggle the rear facing radar by clicking 'REAR' in the center of the HUD. 'TKDOWN' turns on take-down lights on the lightbar. 'Cut F' and 'Cut R' allow you to shutoff ALL lights either on the front of back of the vehicle.
If a user gets into the front passenger seat while your driving (and they are wearing the EVHUD v5.0), you will be asked if you want to 'Allow' them to use the Siren and Light controls. This means you can drive while your friend/ co-worker/ uncle uses the Siren and Lights controls so you attend to the real task at hand, catching the bad guys.
Web Config
As before, you can always change most all configuration options via the 'blue GUI menu system' when clicking on the car. However, you can now configure all models with a rich web interface that generates 'configuration codes'. Codes can be saved on your 'account' which is easy to setup. From there, you can either apply these directly to a car in-world (by clicking the car, 'Web Config') or share these configuration codes in-world to assist other's in setting up their vehicle liveries. Lightbar color's can be setup, plate/ unit numbers easily changed and much, much, much... MUCH more.
Trunk Equipment
Open the trunk and alt-cam inside! You will find road flares, road cones, caution tape and a TPF compatible Fire Extinguisher. To use these, click them and they will ask to attach to your avatar. This prevents your inventory from being filled with numerous unnecessary items.
Road Cones
Some of these items are in limited quantity for simplicity. For instance, the cones yield 4 which can be placed by clicking on the location you want them. Clicking the road cones once they are on the ground deletes all road cones you have placed for easy removal. You can always get more from the trunk if you so desire.
Caution Tape
Cordoning off a scene has never been easier now with the new Tredpro Caution tape. One you wear the object, click where you want the corners of the scene to go. Once you have finished placing the posts for the caution tape to be applied to, click 'Page Down' and the tape will rez along your requested path. Again, just click the tape again and it will delete itself.
Road Flares
Once worn, click and hold to throw them (for your entertainment) or place them where you are standing by just clicking once. Three will be provided per set which will make for more then enough lighting needed to grab oncoming drivers attention. They have a 'lifespan' of 30 minutes each once placed.
Camera Modes
You can now choose from several different camera views when clicking the vehicle, then selecting the 'Camera' menu option.
Normal: Default 3rd person view. Dashcam: Positions the camera behind the police dashboard camera (complete with a working display). Interior: This view is useful if you wish to have an interior view out of the car yet still have access to the HUD to control lights, sirens, etc. Roof: (Self explanatory) Door: (Self explanatory) Roadside: A 'cinematic' style view for your personal entertainment or possibly for Machinma.
Adjustable Drivers Seat
After getting in the vehicle, click the car and choose the menu option 'Stop Engine'. Click the car again and choose 'Adjust Seat'. The Forward and Back arrow keys move the seat forwards and backwards. Page Up and Page Down will move the seat up and down. If someone else changes the seat position, it won't erase yours. Up to 20 recent user's seat configurations will be saved. This helps give you better visibility of the gauge cluster when driving in mouse-look or using one of the 'Camera Modes'. To stop configuring, select 'End Adjust' from the menu.
Center Console
When in mouselook, or alt-camming on the center console of the vehicle, a 'Main Menu' is displayed. You can either 'View Map' (displays the regions map image), or 'Display Settings' (choose what appears on your gauge cluster message display). You can also switch MPH to KMH from this menu. A clock displays current SL time.
Working Window Controls
The driver has control over all 4 windows. Either in mouse-look or while alt-camming inside, you can click the top or bottom of each switch once for it to move up or down completely. Alternatively, you can click and hold the top or bottom of each switch momentarily and release to incrementally move the window to your desired setting. The driver can also 'lock' all windows by clicking the Lock/Unlock button above the window rocker switches on the drivers door.
Improved Horn
No longer do you have to worry about those pesky people clicking your horn. Only you can click the steering wheel to sound the horn!
Interior Ticket Lamp
In most all North American police vehicle, a dual Red/ White 'Ticket Writing Lamp' is standard equipment. In mouse-look or via alt-cam, click it once for White local projected lighting and again for Red 'nightime' light. (This lamp is optional on the Civilian version, enabled via the Web Configuration Tool).
Customizable Rear Window Gentek InfoCenter
There is a customizable Gentek InfoCenter Traffic in the back window of all police models of the Intruder. You can create custom messages to be displayed via the Web Configuration Tool.
Templates
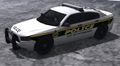
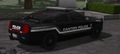
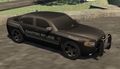
Gallery
Prototype Police Intruder
Pittsburgh Police by Grey Garsdale
Canton Police by Driverkid Baxter
Canton Police Stealth by Driverkid Baxter
Brighton Police by Driverkid Baxter
TDPS Theme by Merlin Leominster
Ridgefield Police by Jaxith Zapatero
GNET Police by Jaxith Zapatero
Flora Land Management by Ozark Mayo


| |||||